HTML is the standard markup language for documents designed to be displayed in a web browser. It defines the content and structure of web content. It is often assisted by technologies such as CSS and scripting languages such as JavaScript. Web browsers receive HTML documents from a web server or from local storage and render the documents into multimedia web pages. HTML describes the structure of a web page semantically and originally included cues for its appearance.
HTML documents can be delivered by the same means as any other computer file. However, they are often delivered by HTTP from a webserver or by email. Dynamic HTML (DHTML) is a term which was used by some browser vendors to describe the combination of HTML, style sheets, and client-side scripts that enabled the creation of interactive and animated documents.
DHTML allows scripting languages to change variables in a web page’s definition language, which in turn affect the look and function of otherwise static HTML page content after the page has been fully loaded and during the viewing process.
DHTML is the predecessor of Ajax and DHMTL pages are still request/reload-based. Under the DHTML model, there may not be any interaction between the client and server after the page is loaded; all processing happens on the client side. By contrast, Ajax extends features of DHTML to allow the page to initiate network requests (or subrequests) to server even after page load to perform additional actions. For example, if there are multiple tabs on a page, the pure DHTML approach would load the contents of all tabs and then dynamically display only the one that is active, while AJAX could load each tab only when it is really needed.
DHTML is not a technology in and of itself; rather, it is the product of three related and complementary technologies.
Typically a web page using DHTML is set up in the following way:
<!DOCTYPE html>
<html lang="en">

<head>
    <meta charset="utf-8">
    <title>DHTML example</title>
</head>

<body bgcolor="red">
    <script>
        function init() {
            let myObj = document.getElementById("navigation");
            // ... manipulate myObj
        }
        window.onload = init;
    </script>
    <!--
    Often the code is stored in an external file; this is done
    by linking the file that contains the JavaScript.
    This is helpful when several pages use the same script:
    -->
    <script src="my-javascript.js"></script>
</body>

</html>
DOM:
The DOM API is the foundation of DHTML, providing a structure interface that allows access and manipulation of virtually anything in the document. The HTML elements in the document are available as a hierarchical tree of individual objects, making it possible to examine and modify an element and its attributes by reading and setting properties and by calling methods. The text between elements is also available through DOM properties and methods.
In HTML DOM, every element is a node: a document is a document node, all HTML elements are element nodes, all HTML attributes are attribute nodes, text inserted into HTML elements are text nodes, comments are comment nodes.
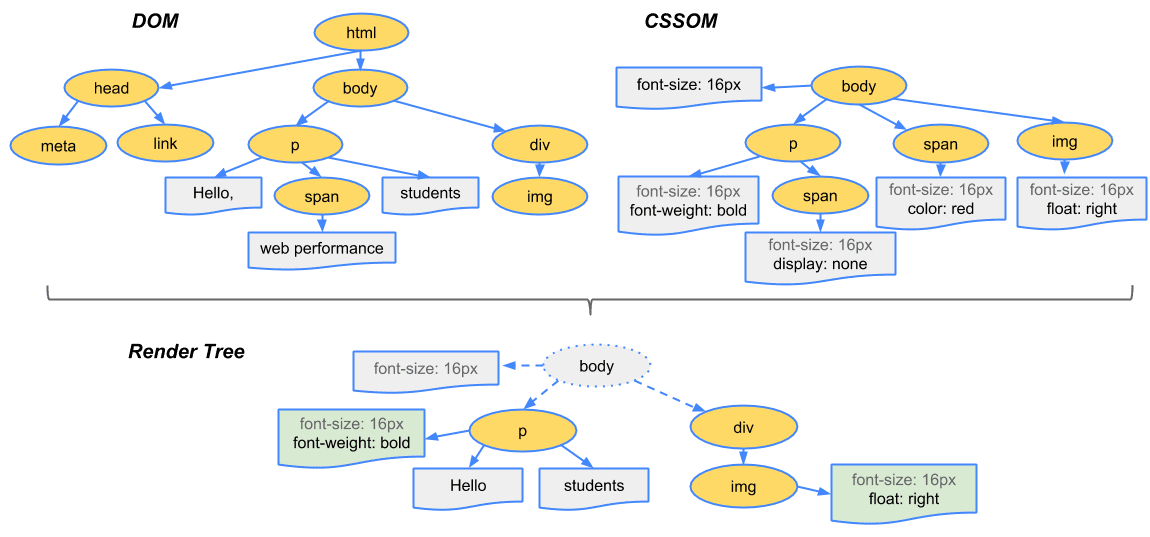
The CSSOM and DOM trees are merged into a render tree, which computes the layout of each visible element and serves as an input to the paint process that renders the pixels to the screen. Optimizing each of these steps is crucial to achieving optimal rendering performance.
To construct the render tree, the browser roughly does the following:
-
Starting at the root of the DOM tree, traverse each visible node
- Some nodes are not visible (for example, script tags, meta tags, and so on), and are omitted since they are not reflected in the rendered output
- Some nodes are hidden via CSS and are also omitted from the render tree; for example, the span node, is missing from the render tree because we have an explicit rule that sets the ‘display:none’ property on it.
-
For each visible node, find the appropriate matching CSSOM rules and apply them
-
Emit visible nodes with content and their computed styles.
Let’s talk about Ajax, moving on from DHTML:
Remember websites in the 90’s?. When you clicked anything, a new page would have to load to show the effect of your click even if it was nothing. That is the internet before AJAX. Now take a look at the very Web with buttons. That’s AJAX for you.
When the browsers send requests to servers for HTML files, those HTML files often contain link elements referencing external CSS stylesheets and script elements referencing external JS scripts.
AJAX works just like webpages:
- The user performs an action (like pressing an up arrow)
- A client (web browser like Firefox) requests data from a server.
- The server processes the request
- The server sends a response back to the client that says if the action was successful or not
- Finally, some of the code already loaded into the web page, decides how to process this new information
- The user only sees that the arrow is orange. All the other steps are hidden so it seems like seamless.
Single-page applications:
Since we not building the entire page with every click, you can keep information about the site in the browser. This can be used throughout your entire visit and future visits. ReactJs is one of a javascript library for building and maintaining single page applications.
At a glance:
Step 1: The browser parses the HTML file first, and that leads to the browser recognizing any link element references to external CSS stylesheets and any script element references to scripts
Step 2: As the browser parses the HTML, it sends request back to the server for any CSS files it has found from link elements, and any JS files it has found from script elements, and from those, then parses the CSS and JS.
Step 3: The browser generates an in-memory DOM tree from the parsed HTML, generates an in-memory CSSOM structure from the parsed CSS, and compiles and executes the parsed JS.
Step 4: As the browser builds the DOM tree and applies the styles from the CSSOM tree (render tree) and executes the JavaScript, a visual representation of the page is painted to the screen, and the user sees the page content and can begin to interact with it.
XML:
XML is a markup language and file format for storing, transmitting, and reconstructing arbitrary data. It defines a set of rules for encoding documents in a format that is both human-readable and machine-readable. The main purpose of XML is serialization, i.e storing, transmitting, and reconstructing arbitrary data. For two disparate systems to exchange information, they need to agree upon a file format. XML standardizes this process.
HTML Tags
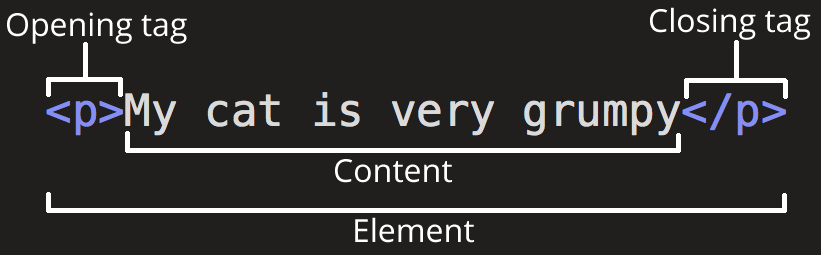
HTML is a markup language that defines the structure of your content. HTML consists of a series of elements, which you use to enclose, or wrap, different parts of the content to make it appear a certain way, or act a certain way.
Element can also have attribute that look like the following:

Headings:
<h1> This is H1 </h1>Text formatting:
<p> hehe </p>
<em> italics </em>
<code> monospace </code>
<strong> boldface </strong>
Links:
<a href="https://www.w3.org/People/Berners-Lee/">TBL</a>Images:
<img src="images/tim.png" alt="image of Tim Berner's Lee" height="200px">TBL</img>Hotlinking is the act of using another site’s bandwidth by displaying their website asset - usually an image, video or audio file - on a different website via a direct link.
Inline vs Block: All of the elements on a page of HTML either flow with the text around them or interrupt the flow by creating a box of content that is separate from the other content on the page. All of the elements that modify text, such as <strong> and <em> are inline elements, which makes sense since we wouldn’t want text to jump to a new line every time we made it bold or italic. Other common inline elements include links and surprisingly images. Inline elements take up only as much width on the page as is necessary to contain the content inside the tags. In contrast, block elements always start on a new line, as if there is a line break in front of them.
Tables:
<table>
	<tr><th>Header 1</th></tr>
	<tr><td>Value h1</td></tr>
</table>
Lists:
<ol><li>Item1</li></ol>
<ul><li>Item1</li></ul>
Forms:
<form>
	<label for="fname">First name:</label><br>
	<input type="text" id="fname" name="fname"><br>
	<label for="lname">Last name:</label><br>
	<input type="text" id="lname" name="lname"><br>
</form>
Divs and Spans:
<header> <h1>...</h1> </header>

<div> </div>
<span> </span>
The additional use of <span> and <div> tags leads to better accessibility for readers and easier maintainability for authors. In standard HTML, a <div> is a block level element whereas a <span> is an inline element. The <div> block visually isolates a section of a document on the page, and ma contain other block-level components. The <span> element contains a piece of information inline with the surrounding content, and may only contain other inline-level components.
Adding styles directly to elements gives you the results you want, yet is considered a bad practice. One reason is that when your styling is kept in a separate file your content and layout, the HTML files are cleaner and easier to maintain.
style = "font-style: italic; font-size: 20px; color: #ff0000; text-align: center"
Floats:
style = "float: left; margin: 10px 10px 10px 10px; padding: 10px;"
Style:
A CSS class acts as a named label for the element, and allows us to simultaneously style all elements with the given class. The code for doing this involves the name of the class with a leading dot and a list of style rules inside curly braces, and in order to apply the styling to the page, this code should be place inside the style tag.
<style>
	.spacing {
		margin: 0 0 0 10px;
	}
</style>
CSS Tags
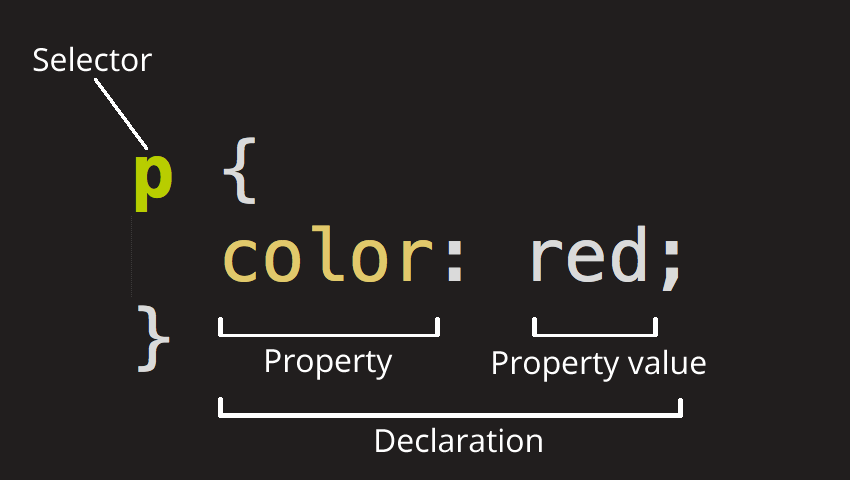
CSS is a way of defining how elements on an HTML page look and are positioned, with styling that flows down from element to element based on factors like which declaration came first, whether an element is the child of a parent element that has styles applied to it, or the specificity of the declaration.
Use class selectors when you want to apply a particular style to multiple elements with a shared class. This promotes reusability and is especially useful when styling elements that share common characteristics across your webpage. On the other hand, use ID selectors when styling a specific, unique element on a page. IDs should be unique within a document, making them ideal for elements that require distinct styling.
Div styles:
.main div {
	background-color: white;

	border: 1px solid black;
	margin: 10px;
	padding: 10px;
}
Flexbox: A flex container refers its layout styled using Flexbox model in CSS. When an element is designated as a flex container, it means that its child elements become flex items and the container itself adopts the Flexbox layout behavior. Flex containers have a main axis and a cross axis.
JavaScript
JS is a programming language that adds interactivity to your website. JS itself is relatively compact, yet very flexible. Developers have written a variety of tools on top of the core JS language, unlocking a vast amount of functionality with minimum effort. These includes: Browser API built into web browsers, providing functionality, such as dynamically creating HTML and setting CSS styles; collecting and manipulating a video stream from a user’s webcam, or generating 3D graphics and audio samples. Third-party APIs that allow developers to incorporate functionality in sites from other content providers, such as Twitter or Facebook. Third-party frameworks and libraries that you can apply to HTML to accelerate the work of building sites and applications.
The basic JS paradigm then to the DOM API: JavaScript
DOM API:
When you create a script, whether inline or included in the web page, you can immediately begin using the API for the window or document objects to manipulate the document itself, or any of the various elements in the webpage (the descendant elements of the document). In simple terms, the window object represents something like the browser, and the document object is the root of the document itself. Element inherits from the generic Node interface, and together these two interfaces provide many of the methods and properties you use on individual elements.
| Method | Description |
|---|---|
querySelector(selector) | Returns the first element that matches the specified CSS selector. |
getElementById(id) | Returns a reference to the element with the specified ID. |
createElement(tagName) | Creates an HTML element with the specified tag name. |
getElementsByTagName(tagName) | Returns a HTMLCollection containing elements with the tag name. |
getElementsByClassName(className) | Returns a HTMLCollection containing elements with the class name. |
A node is a generic name for any type of object in the DOM hierarchy. A node could be one of the built-in DOM elements such as document or document.body, it could be an HTML tag specified in the HTML such as <input> or <p> or it could be a text node that is created by the system to hold a block of text inside another element. An element is one specific type of node as there are many other types of nodes (text nodes, comment nodes, document nodes, etc).
| Method/Attribute | Description |
|---|---|
innerHTML | Represents the HTML content of the element. |
textContent | Represents the text content of a node and its descendants. |
attribute | Represents the value of a specific attribute of the element. |
style | Returns the inline style attribute of the element. |
classList | Returns a DOMTokenList collection of the class attributes of the element. |
appendChild(node) | Appends a node as the last child of the element. |
removeChild(node) | Removes a child node from the element. |
addEventListener(event, func) | Attaches an event handler to the element. |
Asynchronous JS:
Asynchronous programming is a technique that enables your program to start a potentially long-running task and still be able to be responsive to other events while that task runs, rather than having to wait until that task has finished. Once that task has finished, your program is presented with the result. Many functions provided by browsers, especially the most interesting ones, can potentially take a long time, and therefore, are asynchronous. For example:
- Making HTTP requests using
fetech() - Accessing a user’s camera or microphone using
getUserMedia() - Asking a user to select files using
showOpenFilePicker()
Because the program consists of a single thread, it can only do one thing at a time: so if it is waiting for our long-running synchronous call to return, it can’t do anything else. What we need is way for our program to:
- Start a long-running operation by calling a function.
- Have that function start the operation and return immediately, so that our program can still be responsive to other events.
- Have the function execute the operation in a way that does not block the main thread, for example by starting a new thread.
- Notify us with the result of the operation when it eventually completes.
The description of asynchronous functions might remind you of event handlers. Event handlers are really a form of asynchronous programming: you provide a function (the event handler) that will be called, not right away, but whenever the event happens. An event handler is a particular type of callback. A callback is just a function that’s passed into another function, with the expectation that the callback will be called at the appropriate time. However, callback-based code can get hard to understand when the callback itself has to call functions that accept a callback. This is a common situation if you need to perform some operation that breaks down into a series of asynchronous functions.
function doStep1(init) {
	return init+1;
}

function doStep2(init) {
	return init+2;
}

function doStep3(init) {
	return init+3;
}

function doOperation() {
	let result = 0;
	result = doStep1(result);
	result = doStep2(result);
	result = doStep3(result);
}

doOperation();
Here we have a single operation that’s split into three steps, where each step depends on the last step. In our example, the first step adds 1 to the input, the second adds 2, and the third adds 3. Starting with an input of 0, the end result is 6 (0 + 1 + 2 + 3). As a synchronous program, this is very straightforward.
function doStep1(init, callback) {
	const result = init+1;
	callback(result);
}

function doStep2(init, callback) {
	const result = init+2;
	callback(result);
}

function doStep3(init, callback) {
	const result = init+3;
	callback(result);
}

function doOperation() {
	doStep1(0, (result1) => {
		doStep2(result1, (result2) => {
			doStep3(result2, (result3) => {
				console.log(`result: ${result3}`);
			})
		})
	})
}
Because we have to call callbacks inside callbacks, we get a deeply nested doOperation() function, which is much harder to read and debug. This is sometimes called callback hell or the pyramid of doom. For these reasons, most modern asynchronous APIs don’t use callbacks. Instead, the foundation of asynchronous programming in JavaScript is the Promise. A promise is an object returned by an asynchronous function, which represents the current state of the operation. At the same time the promise is returned to the caller, the operation often isn’t finished, but the promise object provides methods to handle the eventual success or failure of the operation. You can attach handlers to the promise object, and these handlers will be executed when the operation has succeeded or failed.
const fetchPromise = fetch("...json");
fetchPromise.then((response) => {
	console.log(`Received response: ${response.status}`);
})
console.log("Started request.");
With the fetch API, once you get a Response object, you need to call another function to get the response data. In this case, we want to get the response data as JSON, so we would call the json() method of Response object. It turns out that json() is also asynchronous. The fetch() API can throw an error for many reasons. To support error handling, Promise objects provide a catch() method. This is a lot like then(): you cal it and pass in a handler function. However, while the handler passed to then() is called when the asynchronous operation succeeds, then handler passed to catch is called when the asynchronous operation fails. If you add catch() to the end of a promise chain, then it will be called when any of the asynchronous function calls fail. So you can implement an operation as several consecutive asynchronous function calls, and have a single place to handle all errors.
const fetchPromise = fetch("...json");
fetchPromise
	.then((response) => {
		if (!response.ok) {
			throw new Error(`HTTP error: ${response.status}`);
		}
		return response.json();
	})
	.then((data) => {
		console.log(data[0]);
	})
	.catch((error) => {
		console.error(`Could not get products: ${error}`)
	})
The promise chain is what you need when your operation consists of several asynchronous functions, and you need each one to complete before starting the next one. But there are other ways you might need to combine asynchronous function calls, and the Promise API provides some helpers for them. Sometimes, you need all the promises to be fulfilled, but they don’t depend on each other. In a case like that, it’s much more efficient to start them all off together, then be notified when they have all fulfilled.
Promise.all([fetchPromise1, fetchPromise2, fetchPromise3])Sometimes, you might need any one of a set of promises to be fulfilled, and don’t care which one. In that case, you want Promise.any(). This is like Promise.all(), except that it is fulfilled as soon as any of the array of promises is fulfilled, or rejected if all of them are rejected:
Promise.any([fetchPromise1, fetchPromise2, fetchPromise3])The async keyword gives you a simpler way to work with asynchronous promise-based code. Adding async at the start of a function makes it an async function. Inside an async function, you can use the await keyword before a call to a function that returns a promise. This makes the code wait at that point until the promise is settled, at which point the fulfilled value of the promise is treated as a return value, or the rejected value is thrown.
async function fetchProducts() {
	try {
		const response = await fetch("...json");
		if (!response.ok) {
			throw new Error(`HTTP error: ${response.status}`);
			const data = await response.json();
		    return data
		}
	}
	catch (error) {
		console.error(`Could not get products: ${error}`);
	}
}
const promise = fetchProducts();
promise.then((data) => console.log(data[0].name));
Dependencies:
A dependency is a third-party bit of software that was probably written by someone else and ideally solves a single problem for you. A web project can have any number of dependencies, ranging from none to many, and your dependencies might include sub-dependencies that you didn’t explicitly install — your dependencies may have their own dependencies.
A project dependency can be an entire JavaScript library or framework — such as React or Vue — or a very small utility like our human-readable date library. The static import declaration is used to import read-only live bindings which are exported by another module. The imported bindings are called live bindings because they are updated by the module that exported the binding, but cannot be re-assigned by the importing module.
There are four forms of import declarations:
import {export1, export2, ...} from "module-name"

import defaultImport from "module-name"

import * as name from "module-name"

import "module-name"
APIs:
Common categories of browser APIs:
- APIs for manipulating documents
- APIs that fetch data from the server
- APIs for drawing and manipulating graphics
- Audio and video APIs
- Device APIs
- Client-side storage APIs
Flask
A minimal Flask application looks something like this:
from flask import Flask
app = Flask(__name__)

@app.route("/")
def hello():
	return "<p>Hello, World!</p>"

if __name__ == '__main__':
	app.run(debug=True)
First we imported Flask class. An instance of this class will be our WSGI application.
Next we create an instance of this class. The first argument is the name of the application’s module or package. This is needed so that Flask knows where to look for resources such as templates and static files.
We then use the route() decorator to tell Flask what URL should trigger our function.
The function returns the message we want to display in the user’s browser. The default content type is HTML, so HTML in the string will be rendered by the browser.
Initialization
All Flask applications must create an application instance. The web server passes all requests it receives from clients to this object for handling, using a protocol called Web Server Gateway Interface (WSGI). Flask includes a built-in development server that is launched when you run your Flask application directly with app.run(). This server is very convenient for development purposes because it is easy to set up and includes features like automatic reloading and a debugger. However, it is not designed for production use due to its lack of efficiency and security features. In production, you should deploy your Flask application using a WSGI-capable server that is designed to handle production traffic. The application instance is an object of class Flask, usually created as follows:
from flask import Flask
app = Flask(__name__)
Routes and View Functions
Clients such as web browsers send requests to the web server, which in turn sends them to the Flask application instance. The application instance needs to know what code needs to run for each URL requested, so it keeps a mapping of URLs to Python functions. The association between a URL and the function that handles it is called a route.
The most convenient way to define a route in a Flask application is through the app.route decorator exposed by the application instance, which registers the decorated function as a route.
@app.route('/')
def index():
	return '<p>Hello World!</p>'
This example registers the function index() as the handler for the application’s root URL. If this application were deployed on a server associated with the www.example.com domain name, then navigating to http://www.example.com on your browser would trigger index() to run on the server. The return value of the function, called the response, is what the client receives. If the client is a web browser, the response is the document that is displayed to the user.
Functions like index() are called view functions. A response returned by a view function can be a simple string with HTML content, but it can take more complex forms.
Modern web applications use meaningful URLs to help users. You can add variable sections to a URL by marking sections with <variable_name>. Your function then receives the <variable_name> as a keyword argument. Optionally, you can use a converter to specify the type of the argument like <converter:variable_name>. The dynamic components in routes are strings by default but can also be defined with a type. For example, route /user/<int:id> would match only URLs that have an integer in the id dynamic segment. Flask supports types int, float and path for routes. The path type also represents a string but does not consider slashes as separators and instead considers them part of the dynamic component.
@app.route('/user/<name>')
def user(name):
	return '<p>Hello, %s!<h>' % name
The portion closed in angle brackets is the dynamic part, so any URLs that match the static portions will be mapped to this route. When the view function is invoked, Flask sends the dynamic component as an argument. In the earlier example view function, this argument is used to generate a personalized greeting as a response.
Server Startup
The application instance has a run method that launches Flask’s integrated development web server. Once the server starts up, it goes into a loop that waits for requests and services them. During development, it is convenient to enable debug mode, which among other things activates the debugger and reloader.
if __name__ == "__main__":
	app.run(debug=True)
The Request-Response Cycle
When Flask receives a request from a client, it needs to make a few objects available to the view function that will handle it. A good example is the request object, which encapsulates the HTTP request sent by the client.
The obvious way in which Flask could give a view function access to the request object is by sending it as an argument, but that would require every single view function in the application to have an extra argument. Things get more complicated if you consider that the request object is not the only object that view functions might need to access to fulfill a request.
To avoid cluttering view functions with lots of arguments that may or may not be needed, Flask uses contexts to temporarily make certain objects globally accessible. Thanks to contexts, view functions like the following one can be written:
from flask import request

@app.route('/')
def index():
	user_agent = request.headers.get('User-Agent')
	return '<p>Your browser is %s</p>' % user_agent
Note how this in this view function request is used as if it was a global variable. In reality, request cannot be a global variable if you consider that in a multi-threaded server the threads are working on different requests from different clients at the same time, so each thread needs to see a different object in request. Context enable Flask to make certain variables globally accessible to a thread without interfering with the other threads.
There are two contexts in Flask: the application context and the request context.
Application context:
current_app: The application instance for the active application.
g: An object that the application can use for temporary storage during the handling of a request. This variable is reset with each request.
Request context:
request: The request object, which encapsulates the contents of a HTTP request sent by the client.
session: The user session, a dictionary that the application can use to store values that are remembered between requests
Flask activates (or pushes) the application and request contexts before dispatching a request and then removes them when the request is handled. When the application context is pushed, the current_app and g variables become available to the thread; likewise, when the request context is pushed, request and session become available as well.
> from app import app
> ctx = app.app_context()
> ctx.push()
> from flask import current_app
> current_app.name
When the application receives a request from a client, it needs to find what view function to invoke to service it. For this task, Flask looks up the URL given in the request in the application’s URL map, which contains a mapping of URLs to the view functions that handle them. Flask builds this map using the app.route decorators or the equivalent nondecorator version app.add_url_rule().
> from app import app
> app.url_map
<Rule '/<filename>' (OPTIONS, GET, HEAD) -> static>,
<Rule '/' (OPTIONS, GET, HEAD) -> index>,
<Rule '/hello' (OPTIONS, GET, HEAD) -> hello>,
<Rule '/hello/<name>' (OPTIONS, GET, HEAD) -> hello_custom>
The HEAD, OPTIONS, GET elements show in the URL map are the request methods that are handled by the route. Flask attaches methods to each route so that different request methods sent to the same URL can be handled by different view functions. The HEAD and OPTIONS methods are managed automatically by Flask, so in practice it can be said that in this application the three routes in the URL map are attached to the GET method.
Sometimes it is useful to execute code before or after each request is processed. For example, at the start of each request it may be necessary to create a database connection, or authenticate the user making the request. Instead of duplicating the code that does this in every view function, Flask gives you the option to register common functions to be invoked before or after a request is dispatched to a view function.
Request hooks are implemented as decorators. These are four hooks supported by Flask:
before_first_request: Register a function to run before the first request is handled.
before_request: Register a function to run before each request.
after_request: Register a function to run after each request, if no unhandled exceptions occurred.
teardown_request: Register a function to run after each request, even if unhandled
exceptions occurred
A common pattern to share data between request hook functions and view functions is to use the g context global. For example, a before_request handler can load the logged-in user from the database and store it in g.user. Later, when the view function is invoked, it can access the user from there.
When Flask invokes a view function, it expects its return value to be the response to the request. In most cases the response is a simple string that is sent back to the client as an HTML page. But the HTTP protocol requires more than a string as a response to a request. A very important part of the HTTP response is the status code, which Flask by default sets to 200, the code that indicates that the response was carried out successfully.
When a view function needs to respond with a different status code, it can add the numeric code as a second return value after the response text.
@app.route('/bad_request')
def bad_request():
	return '<h1>Bad Request</h1>', 400
Responses returned by view functions can also take a third arguments, a dictionary of headers that are added to the HTTP response. This is rarely needed.
Instead of returning, one, two, or three values as a tuple, Flask view functions have the option of returning a Response object. The make_response() function takes one, two, or three arguments, the same values that can be returned from a view function, and returns a Response object. Sometimes it is useful to perform this conversion inside the view function and then use the methods of the response object to further configure the response.
from flask import make_response

@app.route('/response')
def response():
	response = make_response('<h1>This is a response</h1>')
	response.set_cookie('answer', '42')
	return response
There is a special type of response called a redirect. This response does not include a page document; it just gives the browser a new URL from which to load a new pages. Redirects are commonly used with web forms.
A redirect is typically indicated with a 302 response status code and the URL to redirect to given in a Location header. A redirect response can be generated using a three-value return, or also with Response object, but, Flask provides a redirect() helper function that creates this response:
from flask import redirect

@app.route('/fun')
def fun():
	return redirect('http://www.example.com')
Flask Extensions: …
Jinja2 Templates
Consider a user who is registering a new account on a website. The user types an email address and a password in a web form and clicks the Submit button. On the server, a request that includes the data from the user arrives and Flask dispatches it to the view function that handles registration requests. This view function needs to talk to the database to get the user added and then generate a response to send back to the browser. These two types of tasks are formally called business logic and presentation logic, respectively.
Mixing business and presentation logic leads to code that is hard to understand and maintain. Imagine having to build the HTML code for a large table by concatenating data obtained from the database with the necessary HTML string literals. Moving the presentation logic into templates helps improve the maintainability of the application.
A template is a file that contains the text of a response, with placeholder variables for the dynamic parts that will be known only in the context of a request. The process that replaces the variables with actual values and returns a final response string is called rendering. For the task of rendering templates, Flask uses a powerful template engine called Jinja2.
from flask import render_template

@app.route('/user/<name>')
def user(name):
return render_template('user.html', name=name)templates/user.html:
<h1>Hello, {{ name }}!</h1>
The function render_template provided by Flask integrates the Jinja2 template engine with the application. This function takes the filename of the template as its first argument. Any additional arguments are key/value pairs that represent actual values for variables referenced in the template. In this example, the second template is receiving a name variable. Jinja2 recognizes variables of any type, even complex types such as lists, dictionaries and objects.
Variables can be modified with filters, which are added after the variable name with a pipe character as separator. The safe filter is interesting to highlight. By default Jinja2 escapes all variables for security purposes. Many times it is necessary to display HTML code stored in variables, and for those cases the safe filter is used.
Hello, {{ name|safe }}
Control structures: …
Custom error pages:
Flask allows an application to define custom error pages that can be based on templates, like regular routes. The two most common error codes are 404, triggered when the client requests a page or route that is not known, and 500, triggered when there is an unhandled exception.
@app.errorhandler(404)
def page_not_found(e):
	return render_template('404.html'), 404

@app.errorhandler(500)
def internal_server_error(e):
	return render_template('500.html'), 500
Linking:
Writing the URLs as links directly in the template is trivial for simple routes, but for dynamic routes with variable portions it can get more complicated to build the URLs right in the template. Also, URLs written explicitly create an unwanted dependency on the routes defined in the code. If the routes are reorganized, links in template may break.
To avoid these problems, Flask provides the url_for() helper function, which generates URLs from the information stored in the application’s URL map.
In its simplest usage, this function takes the view function name as its single argument and returns its URL. The url_for('index') would return /. Calling url_for('index, _external=True) would instead return an absolute URL.
Static Files
Web applications are not made of Python code and templates alone. Most applications also use static files such as images, JavaScript source files, and CSS that are referenced from the HTML code.
The references to static files are treated as a special route defined as /static/<filename>. For example a call to url_for('static', filename='css/main.css, _external = True) would return http://localhost:5000/static/css/styles.css. Can specify a different path for the static files on the web. Defaults to the name of the static_folder folder.
app = Flask(
		__name__,
		static_url_path='',
		static_folder='static',
		template_folder='templates'
	)
Here the call would have returned http://localhost:5000/css/styles.css.
Example:
The index.html template, provided by the index() view function at the / endpoint, refers to various files, such as images, using absolute paths through the url_for function. When the browser requests these resources, Flask’s endpoints handle these requests.“
Forms and XSRF
The request object exposes all the information sent by the client with a request. In particular, request.form provides access to form data submitted in POST requests. Although the support provided in Flask’s request object is sufficient for handling of web forms, there are a number of tasks that can become tedious and repetitive. Two good examples are the generation of HTML code for forms and the validation of the submitted form data.
pip3 install flask-wtf
By default, Flask-WTC protects all forms against CSRF attacks. A CSRF attacks occurs when a malicious website sends requests to a different website on which the victim is logged in. To implement CSRF protection, Flask-WTF needs the application to configure an encryption key. Flask-WTF uses this key to generate encrypted tokens that are used to verify the authenticity of requests with form data.
app = Flask(__name__)
app.config["SECRET_KEY"] = "..."
The app.config dictionary is a general-purpose place to store configuration variables used by the framework, the extensions, or the application itself. The configuration object also has methods to import configuration values from files or the environment. The SECRET_KEY configuration variable is used as a general-purpose encryption key by Flask and several third-party extensions. For added security, the secret key should be stored in an environment variable instead of being embedded in the code.
When using Flask-WTF, each web form is represented by a class that inherits from class Form. The class defines the list of fields in the form, each represented by an object. Each field object can have one or more validators attached; validators are functions that check whether the input submitted by the user is valid.
from flask_wtf import FlaskForm
from wtforms import StringField, SubmitField
from wtforms.validators import DataRequired

class NameForm(FlaskForm):
	name = StringField('What is your name?', validators=[DataRequired()])
	submit = SubmitField('Submit')
The fields in the form are defined as class variables, and each class variable is assigned an object associated with the field type. Form fields are callables that, when revoked, from a template render themselves to HTML. Assuming that the view function passes a NameForm instance to the template as argument form, the template can generate a simple HTML form as follows:
<form method="POST">
	{{ form.name.label }} {{ form.name(id='my-text-field') }}
	{{ form.submit() }}
</form>
Any arguments sent into the calls that render the fields are converted into HTML attributes for the field.
@app.route('/forms', methods=['GET', 'POST'])
def forms():
	name = None
	form = NameForm()
	if form.validate_on_submit():
		name = form.name.data
		form.name.data = ''
	return render_template('forms.html', form=form, name=name)
The methods argument added to the app.route decorator tells Flask to register the view function as a handler for GET and POST requests in the URL map. When methods is not given, the view function is registered to handle GET requests only. Adding POST to the method list is necessary because form submissions are much more conveniently handled as POST requests. It is possible to submit a form as a GET request, but as GET requests have no body, the data is appended to the URL as a query string and becomes visible in the browser’s address bar. For this and several other reasons, form submissions are almost universally done as POST requests.
The local name variable is used to hold the name received from the form when available; when the name is not known the variable is initialized to None. The validate_on_submit() method of the form returns True when the form was submitted and the data has been accepted by all field validators. In all other cases, validate_on_submit() returns False.
Step 1:
When a user navigates to the application for the first time, the server will receive a GET request with no form data, so validate_on_submit() will return False. The body of the if statement will be skipped and the request will be handled by rending the template, which gets the form object and the name variable set to None as arguments.
Step 2:
When the form is submitted by the user, the server receives a POST request with the data. The call to validate_on_submit() invokes the DataRequired() validator attached to the name field. If the name is not empty, then the validator accepts it and validate_on_submit() returns True. Now the name entered by the user is accessible as the data attribute of the field. Inside the body of the if statement, this name is assigned to the local name variable and the form field is cleared by setting that data attribute to an empty string. The render_template() call in the last line renders the template, but this time the name argument contains the name from the form, so the greeting will be personalized.
Redirects and User sessions:
If you enter your name and submit it and then click the refresh button on your browser, you will likely get an obscure warning that asks for confirmation before submitting the form again. This happens because browsers repeat the last request they have sent when they are asked to refresh the page. When the last request sent is a POST request with form data, a refresh would cause a duplicate form submission, which in almost all cases is not the desired action.
This practice can be achieved by responding to POST requests with a redirect instead of a normal response. A redirect is a special type of response that has a URL instead of a string with HTML code. When the browser receives this response, it issues a GET request for the redirect URL, and that is the page that is displayed. The page may take a few more milliseconds to load because of the second request that has to be sent to the server, but other than that, the user will not see any difference. This trick is known as the Post/Redirect/Get pattern.
But this approach brings a second problem. When the application handles the POST request, it has access to the name entered by the user in form.name.data, but as soon as that request ends the form data is lost. Because the POST request is handled with a redirect, the application needs to store the name as that the redirected request can have it and use it to build the actual response.
Applications can remember things from one request to the next by storing them in the user.session, private storage that is available to each connected client. By default, user sessions are stored in client-side cookies that are cryptographically signed using the configured SECRET_KEY. Any tampering with the cookie content would render the signature invalid, thus invalidating the session.
TF IS WRONG WITH VALIDATORS IN FLASK
Databases
…
Application Programming Interfaces
In recent years, there has been a trend in web applications to move more and more of the business logic to the client side, producing an architecture that is known as Rich Internet Application (RIA). In RIAs, the server’s main (and sometimes only) function is to provide the client application with data retrieval and storage services. In this model, the server becomes a web service or Application Programming Interface (API).
There are several protocols by which RIAs can communicate with a web service. Remote Procedure Call (RPC) protocols such as XML-RPC or its derivative Simplified Object Access Protocol (SOAP) were popular choices a few years ago. More recently, the Representational State Transfer (REST) architecture has emerged as the favorite for web applications due to it being built on the familiar model of the World Wide Web.
Roy Fielding’s PhD dissertation introduces the REST architectural style for web services by listing its six defining characteristics:
-
Client-Server: There must be a clear separation between the clients and the server.
-
Stateless: A client request must contain all the information that is necessary to carry it out. The server must not store any state about the client that persists from one request to the next.
-
Cache: Responses from the server can be labeled as cacheable or non-cacheable so that clients (or intermediaries between clients and servers) can use a cache for optimization purposes.
-
Uniform interface: The protocol by which client access server resources must be consistent, well-defined, and standardized. The most commonly used uniform interface of REST web services is the HTTP protocol.
-
Layered system: Proxy servers, caches, or gateways can be inserted between clients and servers as necessary to improve performance, reliability, and scalability.
-
Code-on-demand: Clients can optionally download code from the server to execute in their context.
The concept of resources is core to the REST architectural style. In this context, a resource is an item of interest in the domain of the application. Each resource must have a unique URL that represents it. A blog post could be represented by the URL /api/posts/12345, where 12345 is a unique identifier for the post such as post’s database primary key.
A collection of all the resources in a class also has an assigned URL. The URL for the collection of blog posts could be /api/posts/ and the URL for the collection for all comments could be /api/comments/.
An API can also define collection URLs that represent logical subsets of all resources in a class.